If you're a company using FreshDesk then you can integrate your ticketing directly into Morbit Studio to:
- Create a ticket directly in Morbit so that it synchronises and is viewable into your FreshDesk installation.
- Create a 'general' ticket for an Organisation
- Create a ticket directly against a device in an Organisation
- Review 'All' or 'Per Organisation' tickets in a centralised Tickets area.
- Add Notes or Replies to a ticket
- Change the status of a ticket
- Resolve or Close a ticket
- View the assigned engineer
- Click-through directly to the main ticket within FreshDesk
Setting Up a FreshDesk Service Account for Morbit
A service account is simply a dedicated FreshDesk agent that represents the morbit system rather than a real person. All tickets created via the API will show as coming from this account, keeping it cleanly separate from your human support agents.
Step 1 - Create a dedicated email address
Before you go into FreshDesk, you need an email address for this account. Create a shared mailbox or alias such as morbit-integration@yourcompany.com (using whatever email system you use — Office 365, Google Workspace, etc.)
This email address will receive FreshDesk notifications for the service account, so it should be something your team can monitor or filter, not a black hole.
Step 2 - Log in to FreshDesk as an Administrator
Go to https://<yourcompany>.freshdesk.com and sign in with an account that has Administrator privileges.
Step 3 - Create a new Agent
- Click the Admin icon in the left-hand navigation (it looks like a cog ⚙️)
- Under the Agents section, click Agents
- Click the New Agent button (top right)
- Fill in the Form specifying the Job Title as something similar to 'API Service Account'.
Step 4 - Set the correct role
The service account needs enough permissions to create, read, and update tickets — but no more than that. The safest approach:
- If you have a built-in role that covers ticket management without admin access, use that
- If not, use Agent as the role — this is sufficient for all the API operations Morbit needs.
Click Save when done. FreshDesk will send an invitation email to the address you used.
Step 5 - Accept the invitation & set a password
- Go to the inbox for the service account email address
- Find the FreshDesk invitation email and click Activate Your Account
- Set a password for the account — store it somewhere safe (e.g. your team's password manager), even though the API won't use it
The API uses an API key, not the password. But the password is required to activate the account and log in if you ever need to check the account manually.
Step 6 — Get the API Key for the service account
This is the key step — you need the API key that belongs specifically to the service account, not your own personal key.
- In a different browser (or an Incognito/Private window), go to https://<yourcompany>.freshdesk.com
- Log in using the service account email and the password you just set
- Click the profile picture / avatar in the top-right corner
- Click Profile Settings
- Scroll down on the right-hand side — you will see Your API Key
- Copy that key
Keep this key secure — treat it like a password. Anyone with this key can make API calls to your FreshDesk account as this agent.
Setting up the integration within Morbit Studio
- Login to Morbit Studio at https://studio.morbit.co.uk
- Go into your Account Settings by clicking the cog icon in the top right of the screen
- Click the Ticketing menu
- Click the Enable Ticketing box and in the Integration drop-down below select FreshDesk.
- Within the FreshDesk Configurationbox, complete the fields:
- Domain: this is the domain value used in the FreshDesk platform
- API Key: add in the value from Step 6 above.
- Company Integration Enabled: tick this
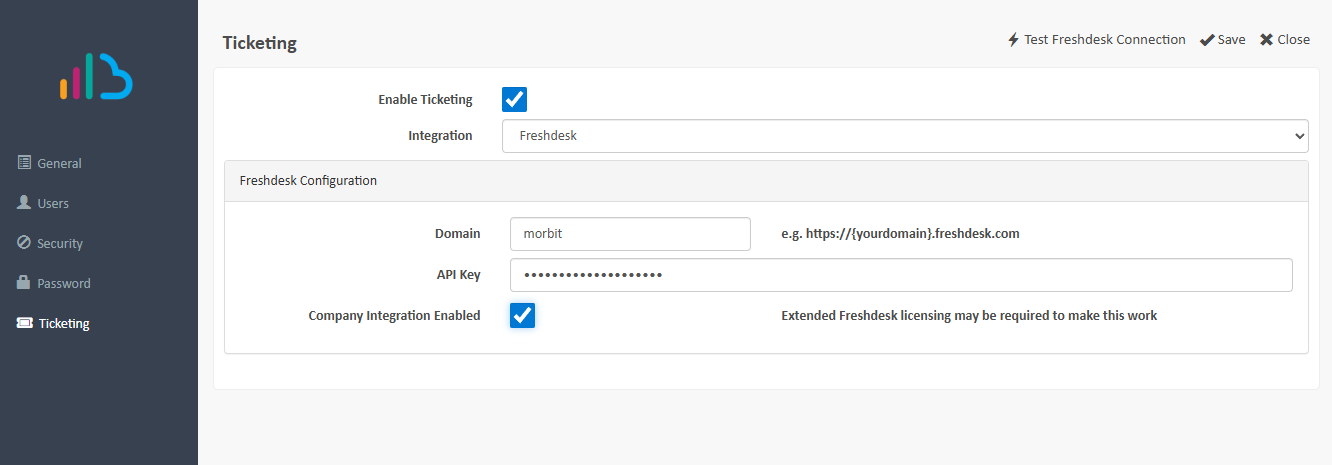
- Click Save, then reopen the Account Settings screen again.
- Test the API connection using the Test FreshDesk Connection button.
- If this is not successful, recheck your API Key is correct and your Domain value.
Company integrations
- Navigate to System > Configuration
- Edit the Organisation you want to synchronise your tickets to, then select the Ticketing menu from the pop-up box
- In the Look UP Company field, search for their name. Note: this is a Live query from your FreshDesk API and if the company is not shown you will need to see this up from within FreshDesk.
- Click the Search button and then click the Use this id button against the correct matching Company.
Viewing Tickets within Morbit Studio
List all Tickets
- Login to Morbit Studio at https://studio.morbit.co.uk
- Navigate to System > Tickets will list all tickets raised
- You can also create a ticket within FreshDesk by clicking the New Ticket button
List Tickets for a device
- Login to Morbit Studio at https://studio.morbit.co.uk
- Navigate to any device within the platform and click it to open the device screen
- Click the Tickets menu item to view tickets for this specific device
- You can also create a ticket within FreshDesk for this device by clicking the New Ticket button
Was this article helpful?
That’s Great!
Thank you for your feedback
Sorry! We couldn't be helpful
Thank you for your feedback
Feedback sent
We appreciate your effort and will try to fix the article